Tabla de contenidos

Change NVIDIA GeForce GTX-660 Ti graphics card thermal paste
What is it for?
That's what this is all about. To replace the GPU thermal paste that dries out over time and loses its properties.
Thermal paste is the element that allows the heat generated by the processor to travel to the heatsink and its fan to expel it.
As I couldn't find a tutorial for this particular model of card, I took advantage of the operation to take a few pictures of the process, which is basically the same for any other graphics card. It is advised to change the thermal paste once a year, I think it lasts much longer. Of course, it is advisable to clean the heatsinks every few months or so.
The computer is a little more than 6 years old and although I usually remove dust, cat hair and unclassified lint from inside and from the heatsinks that are at hand, in all that time I hadn't disassembled anything.
And what usually happens, it started to heat up to the point of disconnecting the graphics card, spitting out a nice black screen that forced a reboot and all the unsaved stuff was lost. That, in my work, can be a real pain. With Photoshop I was starting to do it frequently.
The minimum you need

Thermal pasteHere you can get a bit confused because they come in all types (metal, silicon and ceramic), size, price and quality. Tired of reading opinions I opted for the Arctic MX-4 of 4 grams (which is enough for many uses) and can be found for about 9 euros. It is advisable not to skimp on the price of the paste.
Many people recommend the metal ones (silver) but as it is conductive you have to be very careful because leaving a little bit of paste on the plate or abusing the quantity can cause a disaster.
Isopropyl alcohol. It is not sold everywhere, but it is easy to find on the internet. It is used to remove paste residues and clean dust and dirt without damaging the components and it evaporates quickly.
There are also specific liquids available to prepare the surface after removing the paste. If you don't have isopropyl alcohol at hand, you can use 96º alcohol, being very careful and drying well.
A chamois or microfibre wipes It is advisable to use the microfibre so as not to leave strands that could create an electrical pandemonium with explosions and flares several metres high.
Shower It is advisable to put on new underwear, put on a neoprene suit, depressurise the room where the intervention is to be carried out and prevent access to the area by clumsy people, pets and people who ask stupid questions.
Sticks, napkins, rubber gloves, an aubergine, etc. Here it's up to you depending on your tastes, habits and habits in the practice of computer surgery.

Disassembling
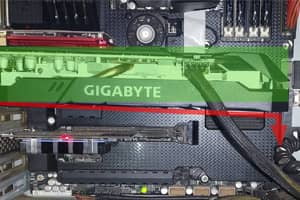
The first thing is to unplug everything and locate the graphics card.

I have it, it's that black thing. As all things are black I put a red arrow on it. Everything brown is shit. It needs to be cleaned. I'm telling you, clean all that shit out already.

Now it has to be removed. First remove the connectors (1) holding the card so as not to force it and wiggle it, the connectors have a tab that you have to press (see picture below). Then remove the screws (2) that hold it to the case and finally push the plastic tab (3) that fixes the card to the slot on the board.

Graphical indications of the insertion and removal process.

Once the card has been removed, it's a good idea to place everything in a clean, uncluttered environment to open it. Although it's a stupid thing to do because I'm such a shitty disassembling things, I even made a plan of the location of the screws. Very useful to put them back in the same holes in case any of the threads got loose later.
Now it's also time to clean it well, for which you can use a soft brush being very careful not to leave any hairs in the sea. If you finish off by cleaning everything with isopro alcohol or the cleaner of your choice, all the better.

The front, the piece that joins the board to the case, has 4 screws that at the same time serve as the thread for the DVI connectors.

Finally, remove the four screws from the central frame, which is the one that joins and connects the board to the heatsink.
When it's your turn to mount this frame, try to tighten two opposite corners first because they are spring-loaded screws and this way the pressure of the frame is equalised in its four points and not only in one side.

Getting to the heart of the matter
This is the state of the frame and the state of the paste.
Be careful with the cable that connects the card to the heatsink, disconnect it very carefully.

The paste was quite dry but there were still some spongy areas.


The thicker stuff can be removed with a cotton swab and comes off easily with minimal pressure, don't think you have to use a chisel or anything. It's almost like blowing it off.

Once the paste has been removed, the surface is thoroughly cleaned, some people even give it a light sanding.
The heatsink now just comes out, so it's time to clean up any poo it may have, in my case it came out with a big lump of crap that almost had the texture of a tiramisu.

Let's go for the graphics processing unit (GPU) processor, which looked like this.

Zoom in

Here you can better appreciate the dry parts.
It reminds us of the aerial photos of the fractal structures of the Andalusian marshes by Héctor Garrido that formed part of the header of the film "La Isla Mínima".

Here it is necessary to be more tactful. One option is to cut a small square the size of the processor out of a piece of paper or plastic to protect the components of the board and then remove the paste with a cotton swab dipped (not too much) in isopropyl alcohol.
After meticulous cleaning, the shiny metal surface appears, complete with letters and numbers.


Give me the paste!
Now the paste is applied. There are as many opinions as there are asses about the amount and the way to apply it. Some say a "pea" in the middle, a "churrito" in the middle, a cross or five dots (in the four corners and in the middle).

There are also those who claim that you don't have to spread the paste over the entire surface, that the heatsink already takes care of spreading it by pressure when it is mounted, as long as the quantity is the right one. But what quantity is that?

Photo out of focus due to the nerves of my first churretazo.
As I wasn't sure, I decided to go for the option "I'll plug in the paste and then we'll see". It's almost as bad to be stingy with the amount as it is to go overboard. Both options can result in the thing not dissipating the heat.
The following photo is absolutely unnecessary and is only added so that the url will be engraved in the most hidden corners of the jar and you will never forget it.

The paste is spread with the spatula very carefully and with the card it is evened out to create a cute, uniform and smooth as a baby's bottom layer.

Even the best renaissance artists couldn't achieve such perfect textures, as you can see.

Now all you have to do is retrace your steps to assemble it and turn on the computer.
You don't have to wait for the paste to stick or dry, you can use the machine straight away. It is said that, depending on the type of paste, it needs between 24 and 200 hours of operation to be fully effective.

All well, it doesn't get hot anymore Here the new temperatures:

![]() Disclaimer: no brand or product mentioned here has given or paid me anything, everything has come out of my moth-eaten pocket and the domestic operation has been motivated by a sluggish economy that does not allow me to
Disclaimer: no brand or product mentioned here has given or paid me anything, everything has come out of my moth-eaten pocket and the domestic operation has been motivated by a sluggish economy that does not allow me to spend to invest in professional services.
![]() The graphics are from the installation manual which you can download here.
The graphics are from the installation manual which you can download here.