Here are some useful code snippets.
They are functions, filters and CSS that I use or have needed at some point in time for the template GeneratePressthat I use and i recommend. Some of them have come out of your support forum, an inexhaustible source of solutions, from his documentation and others from support queries and searches.
Show update date and time in posts next to publication date
This filter shows date and time of update in GeneratePress entries.
It depends on how you have configured the date in Settings/General/Date Format/Custom. In the case used here it looks like this: d/m/Y : H:i
/* Fecha y Hora de PUBLICADO Y ACTUALIZADO EN META POST */
add_filter( 'generate_post_date_output', function( $output, $time_string ) {
    $time_string = '<time class="entry-date published" datetime="%1$s" itemprop="datePublished">%2$s</time>';

    if ( get_the_date() !== get_the_modified_date() ) {
        $time_string = '<time class="entry-date published" datetime="%1$s" itemprop="datePublished">Publicado: %2$s</time> | <time class="entry-date updated-date" datetime="%3$s" itemprop="dateModified">Actualizado: %4$s | </time>';
    }

    $time_string = sprintf( $time_string,
        esc_attr( get_the_date( 'c' ) ),
        esc_html( get_the_date() ),
        esc_attr( get_the_modified_date( 'c' ) ),
        esc_html( get_the_modified_date() )
    );

    return sprintf( '<span class="posted-on">%s</span> ',
        $time_string
    );
}, 10, 2 );
Remove commas between tags
That's all there is to it. If you don't want commas between tags, this filter will not show them.
/* QUITA LAS COMAS EN LAS ETIQUETAS */
add_filter('generate_term_separator', function($separator, $tags){
	return " ";
}, 10, 2);
Add background colour to categories and tags
With this CSS you can add any colour you want to all categories and/or all tags.
The CSS in the example would display them like this:

/* Categorías y colores */
.entry-meta .cat-links a {
    padding: 3px 5px;
    font-size: 17px;
	background-color: #B50000;
	border-radius: 5px;
    color: #FFF

}
/* Etiquetas y colores */
.entry-meta .tags-links a {
	padding: 3px 5px;
	font-size: 17px;
	background-color: #006a05;
	border-radius: 5px;
    color: #FFFF
}

/* Espacio entre línea de categorías y etiquetas */
.cat-links {
    margin-bottom: 10px;
}
Show a different background colour for each category or tag
With this CSS you will be able to give a different colour to each category. To do this you will have to write a piece like this for each category or tag you want to modify. In the first example we use the category "wordpress" to which we add blue background and white text. In the second example we use the tag "blog" to which we add orange background and white text.
And this is the result:

/* Mostrar un color diferente para cada categoría o etiqueta */
#main span.cat-links a[href*="wordpress"] {
    background-color: #005ca5;
    color: white;
}


#main span.tags-links a[href*="blog"] {
    background-color: #d47e00;
    color: white;
}
Show only the years in the archive widget
This function will make the archive widget dropdown show only years instead of months. It works for any template, as it acts on a native WordPress widget. Useful if your blog is very old and the months dropdown is already too long. In the example it is shown with the number of published posts.
/* MOSTRAR SOLO AÑOS EN ARCHIVO WIDGET */
function my_limit_archives( $args ) {
    $args['type'] = 'yearly';
    return $args;
}

add_filter( 'widget_archives_args', 'my_limit_archives' );
add_filter( 'widget_archives_dropdown_args', 'my_limit_archives' );
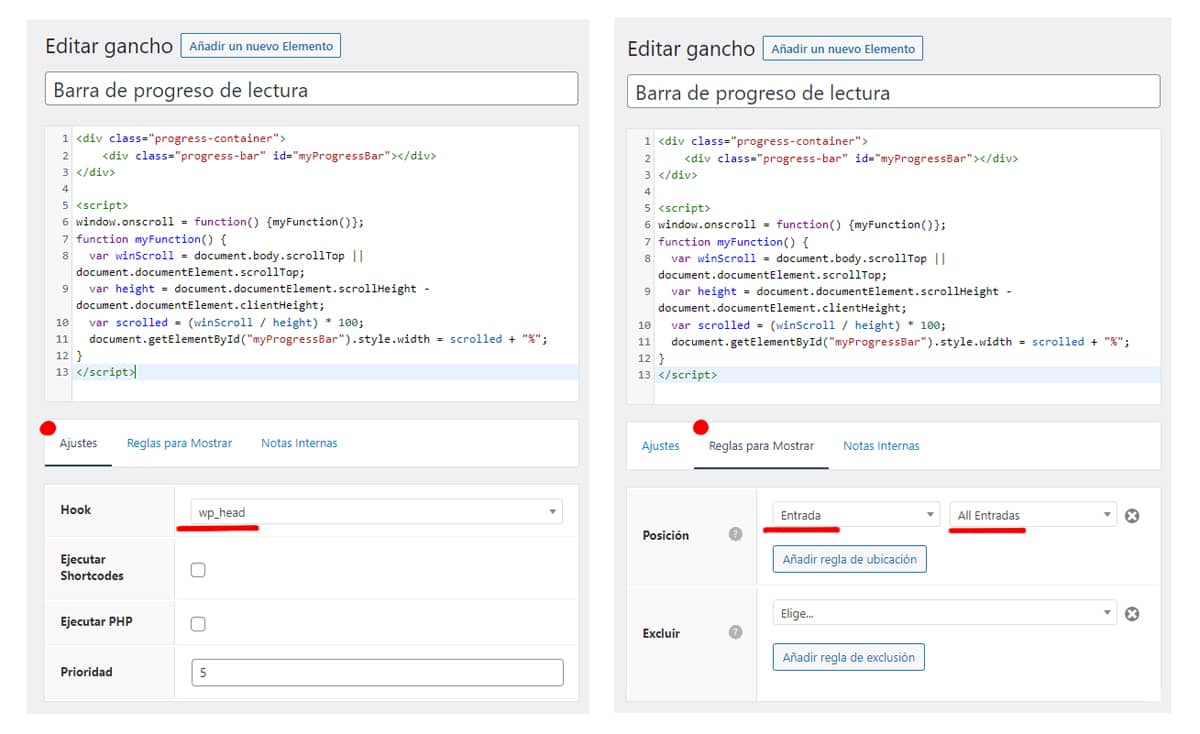
Simple read progress bar without plugin
There are several plugins for adding a reading progress bar in WordPress and also addons for Elementor, but with a bit of code and a filter from Elements from GeneratePress it can easily be made to be much more lightweight. This code is from Somnath Sahu
For this example you need to use the GeneratePress Premium version.
First we create a filter with Elements with this code.
<div class="progress-container">
    <div class="progress-bar" id="myProgressBar"></div>
</div>

<script>
window.onscroll = function() {myFunction()};
function myFunction() {
  var winScroll = document.body.scrollTop || document.documentElement.scrollTop;
  var height = document.documentElement.scrollHeight - document.documentElement.clientHeight;
  var scrolled = (winScroll / height) * 100;
  document.getElementById("myProgressBar").style.width = scrolled + "%";
}
</script>
We set it with the wp_head position and have it displayed in Posts / All Posts.
/*** Barra de progreso de lectura - Progress bar **/
.progress-container {
width: 100%;
height: 8px;
background: #ccc; /** Change Progress bar background color **/
}
.progress-bar {
height: 8px;
background: #a70404; /** Change Progress bar color **/
width: 0%;
position:fixed;
z-index:999;
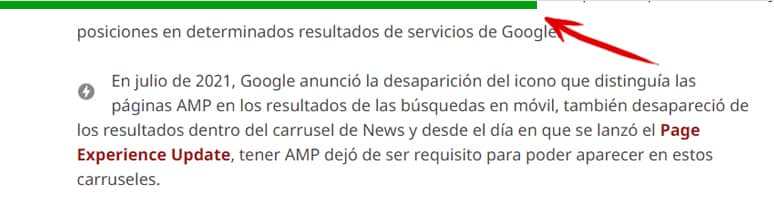
}And this is how this code is displayed after changing the colour to green
The progress bar will appear at the top, it will accompany us during the reading and it will increase as we scroll down and decrease if we scroll up.
Change the logo only on a specific page
I needed this once and I found it at the time on the page of David Lanau. The filter shows a different logo only on the page you specify and I used it to put a different logo on a category page that grouped contents of a specific theme.
add_filter( 'generate_logo','tu_custom_about_logo' );
function tu_custom_about_logo( $logo )
{
 	// Si estamos en la página servicios, vamos a poner nuestro logo personalizado para esta página
 	if ( is_page( 'servicios' ) )
 	 	return 'PON LA URL DEL LOGO AQUÍ';

 	// Y SI NO, PON EL LOGO GENERAL
 	return $logo;

 }
Hide the sibebar in the mobile version
If you are one of those who still use sidebars and you have dispensed with the aMP pagesif you use the native mobile version of GeneratePress with sidebar, with this CSS you can hide it only for the mobile version.
In this case you can add it to the stylesheet in your child theme or from Custom/Additional CSS.
Hide right sidebar
@media(max-width: 768px) {
    #right-sidebar {
        display: none;
    }
}
Hide left sidebar
@media(max-width: 768px) {
    #left-sidebar {
        display: none;
    }
}
Hide both
@media(max-width: 768px) {
    #right-sidebar, #left-sidebar {
        display: none;
    }
}
Display featured images in the loop left and right
If you use a template traditional GeneratePress like Marketer or similar, with this code you can show the featured image alternating left or right in the loop
.post-image-aligned-left .type-post:nth-child(even) .inside-article .post-image {
    margin-left: 2em;
    float: right;
    text-align: right;
}
I found this code at aquigeneratepress.com where you can find other useful tricks. And here is the result

Customise the "Read more" button
As above, this CSS is for the "Read more" button. It's the one I use here and places it to the right under the excerpt on the front page.
a.read-more {
display: inline-block;
color: white !important;
padding: 10px;
border-radius: 10px;
float:right
}
Entry pagination styling
A filter and a bit of CSS to get this look for the pagination of posts on the front page. From here, you can tweak it to your heart's content.

The first thing we need to do is replace the words Previous and Next with the << and >> symbols with this filter that you can add in the functions.php of your child theme or with Code Snippet.
/* Cambia ANTERIOR y SIGUIENTE por << y >> en navegación */
add_filter( 'generate_previous_link_text', function() {
	return '<<';
} );

add_filter( 'generate_next_link_text', function() {
	return '>>';
} );
And then the CSS, added in the same way as in the previous cases
/* Paginacion entradas */
#nav-below {
    text-align: center;
}
.paging-navigation .nav-links>* {
	  font-size: 20px;
    padding: 7px 10px;
    background-color: #870000;
    color: white;
    border-radius: 4px;
}
.paging-navigation .nav-links span.page-numbers.current {
    background: red;
    color: #ffffff;
}
a.next.page-numbers > span {
    display: none;
}
Centering the browser box
The native GeneratePress search box is a bit lame, here's a bit of CSS to adapt it to devices and centre it.
/* Centrar caja de búsqueda en menú principal */
form.search-form.navigation-search.nav-search-active {
    width:50%;
    left:50%;
    transform:translateX(-50%)
}

 /* Responsive caja de búsqueda en móvil - tablet y PC */
@media (max-width: 768px) {
    /* CSS in here for mobile only */
        form.search-form.navigation-search.nav-search-active {
        width:100%;
        left:50%;
        transform:translateX(-50%)
    }
}
@media (min-width: 769px) and (max-width: 1024px) {
    /* CSS in here for tablet only */
    form.search-form.navigation-search.nav-search-active {
    width:100%;
    left:50%;
    transform:translateX(-50%)
    }

    .inside-navigation {
        align-items: flex-end !important;
        flex-direction:column-reverse;
    }
}
@media (min-width: 1025px) {
    /* CSS in here for desktop only */
        form.search-form.navigation-search.nav-search-active {
        width:40%;
        left:50%;
        transform:translateX(-50%)
    }
}
Category and tag text size
If you display the categories and tags under the posts, by adding this CSS you can change the size and keep adding CSS to style them the way you want. All the classes to modify them can be found in the documentation or in the CSS itself, but if you don't want to complicate things, here it is.
.entry-meta .cat-links a {
    padding: 3px 5px;
    font-size: 20px;
}
.entry-meta .tags-links a {
    padding: 3px 1px;
  font-size: 20px;

}
Animated underlined links
CSS to create an animated effect for your text links like the one you see in the gif below:

/* Subrayado de enlace animado con color de fondo */
p a{
  font-weight: bold;
  background-image: -webkit-gradient(linear, left top, left bottom, from(#fdede7), to(#fdede7));
  background-image: linear-gradient(to bottom, #fdede7 0%, #fdede7 100%);
  background-repeat: no-repeat;
  background-size: 100% 00%;
  background-position: 0 111%;
  -webkit-transition: background-size .25s ease-in;
  transition: background-size .25s ease-in;
  padding-left: 2px;
  padding-right: 2px;
  border-bottom: 2px solid #ec4911;
  -webkit-transition: all 0.3s;
  transition: all 0.3s;
}

p a:hover{
  background-size: 100% 100%;
}
In background-image and border-bottom you can change the colors.
You'll have to observe the behavior in paragraphs, buttons and other elements that include links to adjust it so that nothing is out of place.
The code is Kyle Van Deusen that, in addition to The Admin Bar, has an interesting blog called Generatetweaks where he publishes several curious pieces of code and templates for GeneratePress and GenerateBloks, like this dark mode for GP and GB.


