
In the plan to extend the life of my PC, which is already 11 years old and still performing well, there is little room for manoeuvre except to change the motherboard and processor and therefore also RAM, which would be almost as expensive as building a new one.
One of the last possible cheap improvements was to add an M.2 NVMe disk, but the board doesn't have slots as it is before the year of release of this type of drives. Today we'll look at two ways to connect them in this case.
If you're already using 2.5-inch Sata SSDs, there aren't many scenarios where adding an M.2, or swapping one of them for an M.2 NVMe drive, to an older board without M.2 NVMe slots will offer much of an advantage.
Furthermore, the improvement is nowhere near as noticeable as when switching from a mechanical HDD to an SSD. You get faster file transfer speeds and in the case of games a very slight reduction in loading, but not in performance.
Reasons for doing so
The main compelling reasons for practical purposes, beyond pure whim, can be twofold:
1 -To get faster transfer speeds for large files
If you move a lot of large files is where it is most noticeable, you will gain time thanks to the increase in read and write speed. In my case, it is an improvement because I usually accumulate almost every day image files of good weight and at the end of the week there are several folders that then have to be moved to the archive.
2 - Having more storage space for a little less money
M2 NVMe SSDs are no longer expensive, for a little less than what you pay for a 500 Gb Sata SSD of average quality you can now buy a 1Tb one from a good brand.
The NVMe M.2 drive of choice

The M2 disk chosen to test the two installation options on a board without a slot is a Crucial P3 1TB PCIe Gen3 model CT1000P3SSD801 (Acronis Edition) which can drive up to 3500MB/s.
Enough, plus, as it was mounted in 2012, my top PCIe slot is 3.0 so, at most it can go (with the X4 adapter, i.e. it uses 4 lanes) to ~4GB/s, so there's no point in a faster drive because you're not going to be able to take advantage of it.
| Version PCIe | Transfer rate | Per lane | x1 | x4 | x8 | x16 |
| 1.0 (2003) | 2.5 GT/s | 2 Gbit/s (250 MB/s) | 250 MB/s (2 Gbit/s) | 1 GB/s (8 Gbit/s) | 2 GB/s (16 Gbit/s) | 4 GB/s (32 Gbit/s) |
| 2.0 (2007) | 5 GT/s | 4 Gbit/s (500 MB/s) | 500 MB/s (4 Gbit/s) | 2 GB/s (16 Gbit/s) | 4 GB/s (32 Gbit/s) | 8 GB/s (64 Gbit/s) |
| 3.0 (2010) | 8 Gbit/s | 7.9 Gbit/s (984.6 MB/s) | 985 MB/s | 3.9 GB/s | 7.8 GB/s | 15.8 GB/s (126 Gbit/s) |
| 4.0 (2017) | 16 GT/s | 15.8 Gbit/s (1969.2 MB/s) | 1.9 GB/s | 7.8 GB/s | 15.8 GB/s | 31.5 GB/s (252.1 Gbit/s) |
| 5.0 (2019) | 32 GT/s | 31.6 Gbit/s (3938.4 MB/s) | 3.9 GB/s | 15.8 GB/s | 31.5 GB/s | 63 GB/s (504 Gbit/s) |
| 6.0 (2022) | 64 GT/s | 64 Gbit/s (7877 MB/s) | 7.5 GB/s | 30.2 GB/s | 60.5 GB/s | 126 GB/s1008 Gbit/s (1008 Gbit/s) |


*Remember that removing the sticker from the drive voids the warranty, in my case I decided to sacrifice it for a reason you will see below.
Its normal price is around 48€, with a couple of discounts I got it for just under 40, which is not bad at all. It's still well below the price of cheaper, lower capacity SATA SSDs.
Options
There are two possibilities (you can do both at the same time to use two or more drives). The first is to use an external enclosure with a USB A and/or C cable and the other a PCIe adapter.
1- With external USB Selore enclosure with fan

The quickest and easiest option. Just put the drive in an enclosure, plug it into a USB port and off you go. It is also the most expensive option and has other drawbacks. For starters, forget about using it to install the operating system on the M2.
The USB enclosure I tested is a Selore M.2 NVME SSD SATA with cooling fan that contains a 10Gbps PCIe NVME USB C 3.2 Gen 2 PCIe M-Key (B-Key M) 2242/2260/2280 SSD adapter.


It includes a thermal pad for your drive, two screws to secure the 2242 and 2260 drives (for the 2280 no screw is needed as a plastic tab is used) and two cables, one USB Type-C 3.1 and one USB 3.0 Type-A.
You can find this case on Amazon for 39,99€
I was able to receive and test this case from Selore thanks to the Amazon Vine programme. All other products, or parts required for installation, listed in this article were paid for out of my own pocket and purchased from various shops.
There is a wide variety of enclosures of different qualities and prices, with and without cooling and with the possibility of housing two or more disks. Not all of them work well and this one stands out for its quiet condensing fan and temperature control chipset.
These are the results running with USB-A 3.0, obviously much improved using USB-C 3.1 or higher.

It's not spectacular speed, but for running under USB 3.0 it's pretty decent.
For comparison, these are the results for the other two 2.5" Sata SSDs, a 500 Gb Samsung EVO (used for the system) and a 240 Gb Kingston A400 used as storage, to run certain programs and, occasionally, a game.


Temperature
The manufacturer claims a temperature 2.22°C lower than other cases of this type. I can't verify this because I don't have any comparison elements as I haven't tested other fanless cases. It is true that it maintains very optimal and ideal temperatures to extend the life of the disk. At no time has it ever exceeded 40 degrees Celsius working without a break and the average temperature has been around 35.
With little activity, at rest or in suspension, it drops by far below 30°C and even drops to 25°C, sometimes staying much cooler than the sata SSD used for the operating system.
Its on-chip temperature control and auto-sleep do their job very well.
Installation couldn't be simpler. You place the drive in the slot and snap it in.
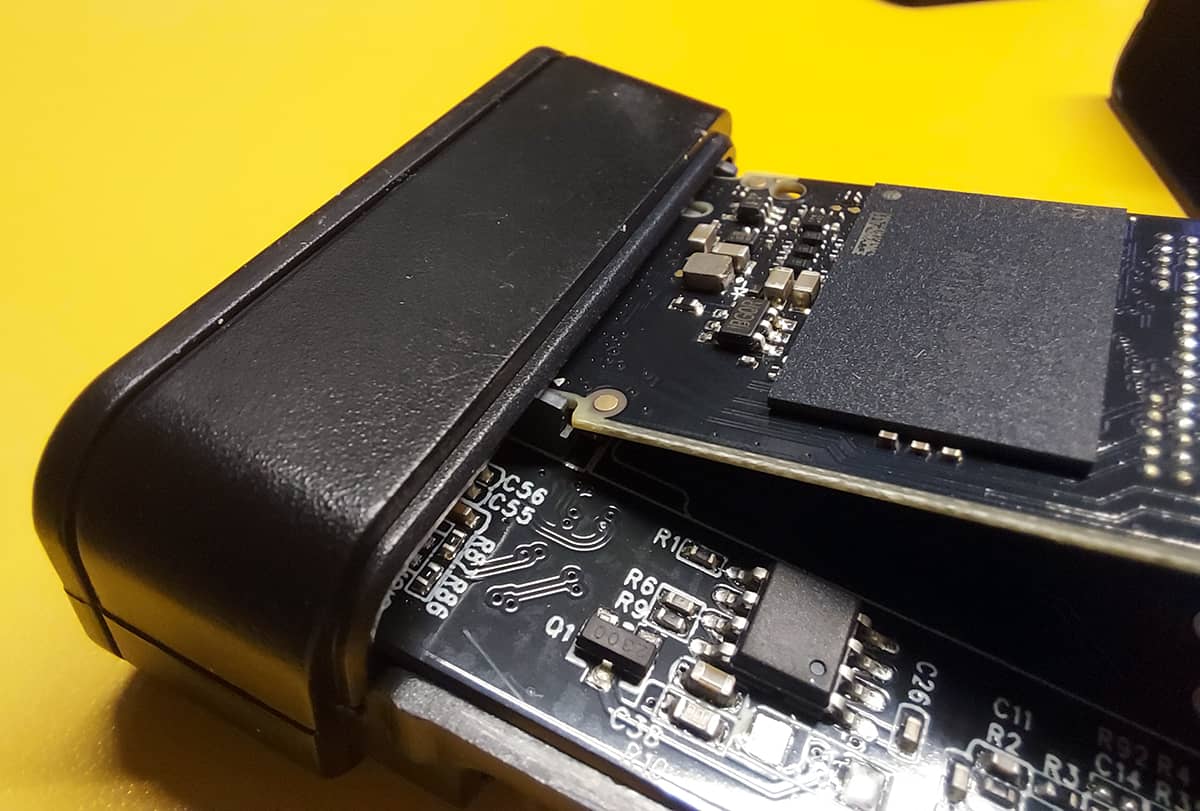

Then you put the heating pad on top of it.
It is in this part of the process that many advise removing the sticker from the disc instead of placing the thermal pad on top because it dissipates much better. Even the manufacturer, in their promotional videos, installs it without the sticker.
However, others claim that it is no longer necessary because the stickers on the discs are designed for that use. In my case, the temperature was lower without the sticker. Either way, the decision is yours.
It is important. If you remove the manufacturer's sticker, you will lose the disc's warranty.


Close it and plug it in.

After that, if it does not appear as a disk drive, just go to the Windows disk management tool where you will most likely find it as"Unallocated" and"Uninitialised".

From the same tool you can initialise and format it in a simple way by right clicking on the drive and selecting "Initialise disk".
In general it works well, it is well made and its cable is very flexible, high quality and very mouldable, which is appreciated, but it is very short and if you have the tower on the floor and you don't have a hub on the table (or on the monitor as in my case) it can be a nuisance.


But if you are looking for a cheaper alternative. You will find many different models of adapters. Read on to discover their advantages.


